Lesson Plan by E. Dominic Black, MA Ed.
suggested for 6 - 12th grade
Overview
A scanning electron microscope (SEM) shoots a beam of electrons that scans across the specimen releasing “secondary” electrons into a detector where they are converted to create a highly detailed image. By recording your observations with drawings using only dots of ink, an art technique called stippling, you will be working in the same manner as the SEM–using tiny particles to generate an image.
concepts
- The SEM projects electrons over the surface of a specimen or sample causing "secondary" electrons to be released. The "high" and "low" intensities of these released electrons are used to create an image.
- Stippling, a drawing technique using dots, can be used to help visualize how an SEM produces an image using tiny particles.
- Recording observations with drawings allows a researcher to share their work with others and is a valid and important part of the scientific method.
objectives
- Students will see how a full image forms from many tiny components.
- Students will practice stippling and connect this art technique to the way the SEM forms an image.
- Students will learn how the SEM uses tiny particles to generate an image.
duration
- Pre-Visit: 15 minutes
- Visit: 40 minutes
- Post-Visit: 15 minutes
location
SEM Lab/Gem & Mineral Hall at NHM
materials
vocabulary
- Scanning Electron Microscope
- Electron
- Specimen
- Lens
- Stippling
- Value (element of art)
Outline
- Pre-Visit: Briefly introduce the SEM Lab. You may look at the Pre-Visit Slides, as they provide an overview.
- Explain how the SEM works (by projecting electrons) and relate this to drawing with dots (stippling).
- Visit: Students select a specimen and draw it, making it entirely out of dots.
- Time permitting, allow students to record observations of several other specimens on the provided worksheet.
- Post-Visit: Students create a classroom display of their artworks.
Pre-Visit
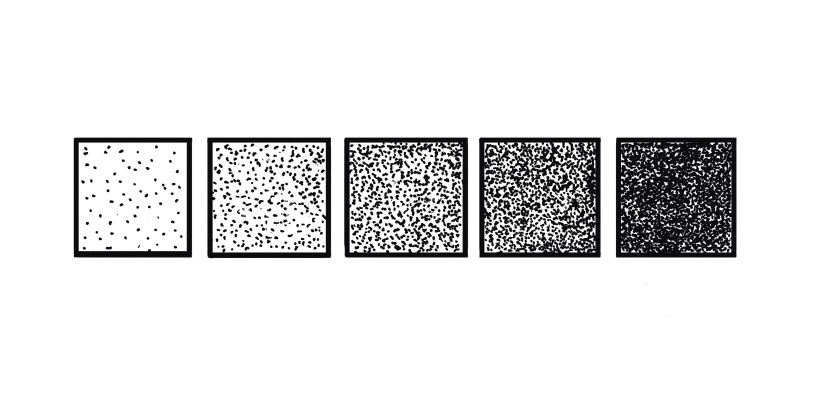
Introduce the SEM Lab and explain how its technology works. You may use the Pre-Visit Slides for this. Explain to students that the SEM shoots a beam of electrons that scans across the specimen releasing “secondary” electrons into a detector where they are converted to create a highly detailed image. The intensity of the released electrons produces the "highs" and "lows", or light and dark areas of the specimen. Stippling is an art technique that uses many small dots to create shading and show value–how light or dark something is. The ink dots placed closer together create dark areas and represent the “lows” of the specimen. The areas with fewer dots will appear lighter and represent the “highs” of the specimen. Explain to students that they will be using art tools and observation to work as scientific researchers and illustrators during their Museum visit.
Visit
Introduce the SEM lab, including its major components and capabilities. Point out the SEM images on display in the lab, making note of the scale of the objects. Be sure to re-introduce vocabulary (SEM, specimen, electrons, lens) with use of the exhibit’s text.
Explain the activity and worksheet, reading the instructions aloud for younger learners. Distribute art supplies and worksheets, then instruct students to look for one specimen to draw. You may stay in the Gem & Mineral Hall for the drawing portion, or try a different area of the Museum (suggested under Variations & Extensions). The following are guidelines and tips for the drawing activity:
- Inspiration is everything. Encourage students to choose a specimen that they want to draw. If students are excited about their specimen because of personal choice, they will be more engaged and motivated to complete the drawings.
- The entire drawing is to be made of dots and done within the large square on worksheet.
- Students look for the “lows” or dark areas of the specimen and make dots there.
- The more concentrated the dots are, the darker the area will look.
- Dots spaced far apart will form the lighter portions on the image.
- Encourage students to periodically hold their work at arm’s length to see it from a distance. The light and dark areas will seem more obvious and they will have a better idea of how to continue.
- Encourage students to label their work with the specimen’s name.
- Time permitting, students may draw another specimen in the smaller box on the worksheet.
Post-Visit
- Encourage students to finish their drawings while in the presence of the specimens. Although drawing on location is preferred, it is often necessary in both the worlds of art and science to use reference photos. You may choose to let students take photos and finish their work back in the classroom.
- In the classroom, students may create a display of their artworks. Sharing what is learned through observation is a valuable part of the art-making experience, and sharing data such as scientific illustration is vital to new scientific research.
Variation & Extension Ideas
- The SEM Lab is a logical place to start this activity due to the topic (using electrons to create images) and its physical proximity to the Gem & Mineral Hall, which has excellent subject matter for dot drawings. This activity can be done in other areas of the Museum, so long as students are able to get close enough to view object details. Areas to consider are the Dinosaur Hall, Age of Mammals Hall, and the Visible Vault.
- If a visit to the Museum is not possible, this activity can be done in the classroom or outdoors. You may invite students to bring an object into class to observe and draw.
Other Considerations
- Time on task with this activity can vary; a personal interest in the specimen selected is helpful as the project requires patience.
- Fine tip black markers work best with this activity, as they make consistent dots.
- With this type of drawing “mistakes” usually do not matter much. Even though ink cannot be erased, students can learn to work with their mistakes. A few errant dots will not detract from the overall success of the project, which teaches students that a drawing can be imperfect in places and still communicate an idea very clearly.
- As this technique (stippling) requires less precision than drawing with lines, students lacking confidence in drawing are often very successful with this method.
SEM Lab FAQs
Will my students be able to use the Scanning Electron Microscope during their visit?
- No, the SEM is a powerful research tool used only by Museum staff who have specialized training and expertise. The SEM is always visible to Museum visitors through the window in the SEM Lab.
Will a scientist be demonstrating how the Scanning Electron Microscope works during our visit?
- There may be a Museum scientist working with the SEM during your visit, but there is no scheduled programming. You will be able to look at the SEM from behind glass and learn how the SEM works through exhibit pictures and text.
Standards
NGSS
5-PS1-1
Crosscutting Concepts
Scale, Proportion & Quantity (MS-PS1-1)
VAPA
Prof.VA:Pr5